Advanced ConvNet for Detecting Simpsons Characters Trained with Transfer Learning

Imagine sitting on your canary-yellow couch, sipping an ice-cold Duff with Homer, as Bart throws out a few quips and Lisa tries to correct you on every topic. Now, picture this: your one and only mission is to build a convolutional neural network (CNN) that can accurately recognize each member of the Simpsons cartoon. Because, with all that yellow around, even the best deep learning models might slip up!

The mission is clear: identify Homer, Bart, Marge, and the entire cast of Springfield with high precision and robust performance, as the images are dynamic, and the characters aren’t in obvious poses or positions.
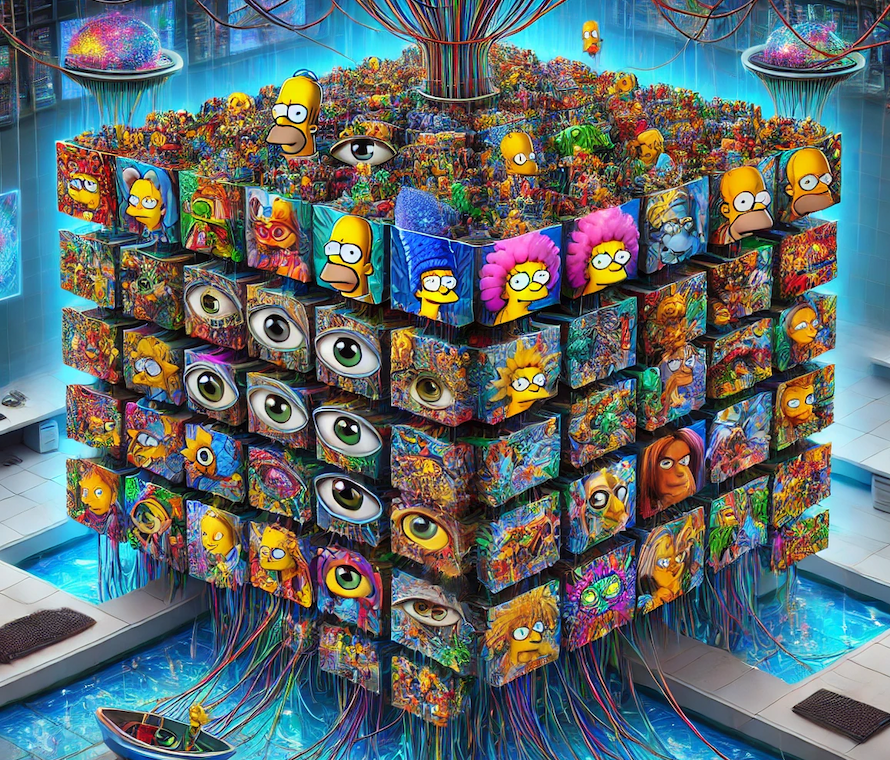
Let’s kick things off with a spoiler: the ConvNet we built achieved extraordinary results on every front.

The outstanding accuracy achieved in recognizing characters on any new image (not used during training) is: 93.65%

ANALYZE, REVIEW, AND FREELY MODIFY THE KAGGLE NOTEBOOK WITH THE SOURCES HERE
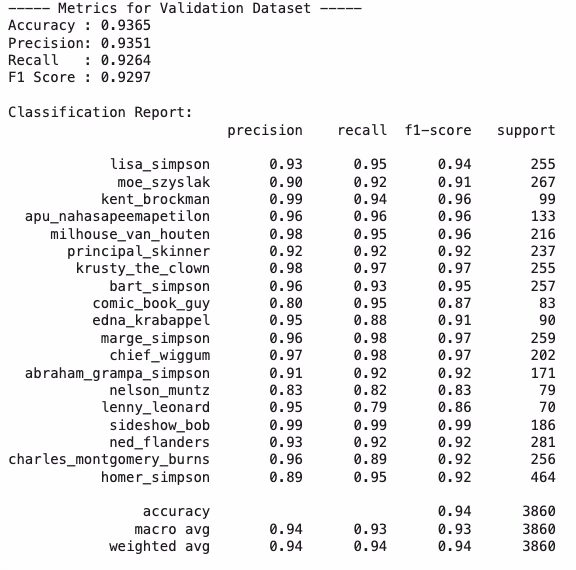
Metrics for Validation Dataset are excellent

How did I achieve this? I built my best CNN, trained using transfer learning and enhanced with data augmentation to improve robustness and generalization. This challenge was a magical doorway, plunging me once again into the fascinating world of deep learning—a parallel dimension where every pixel offers a new opportunity to experiment with and dive into cutting-edge techniques. And so, once again, after long workdays, I found myself on the metro, in the car, or even in some magical corner, studying and coding.

The dataset I ventured into is the famous “The Simpsons Characters Data” (by Alexandre Attia) available on Kaggle: 16,670 images covering a whopping 43 different characters from Springfield. After acquiring it, I stumbled upon the first challenge—worthy of a Simpsons-style slip on a banana peel: the dataset is highly imbalanced. Main characters have thousands of images (Homer, Bart, Lisa), while others have only a few (poor Lionel Hutz and Disco Stu!).

To balance the dataset, I had to set a threshold: only characters with at least 200 images were included in the training. This allowed me to focus on well-represented characters. With this selection of Springfield’s finest, the CNN had a solid foundation to start accurately recognizing the most iconic characters.
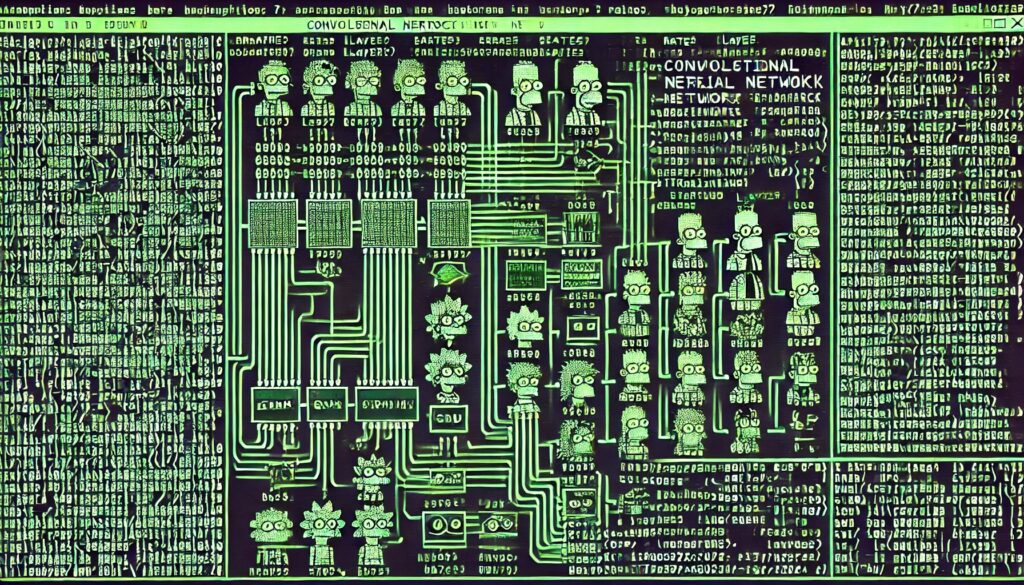

Transfer learning is a technique where you take a pre-trained model (such as one trained on ImageNet) and “transfer” its knowledge to solve a specific new task, like recognizing the Simpsons characters. This approach allows you to leverage the initial layers, already ‘skilled’ at recognizing general patterns (shapes, colors, textures), so you can focus on fine-tuning only the final layers to distinguish the unique details of each character. Generally, for this type of problem, it’s an excellent solution.
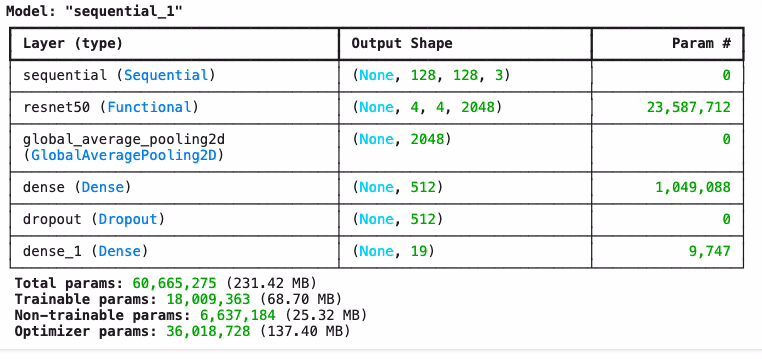
CNN model structure

Identifying the overall structure is an art akin to magic. For this project, I sought a blend of flexibility and robustness: data augmentation enhances generalization, the base model leverages the power of transfer learning, and GlobalAveragePooling2D reduces parameters while retaining essential information. The dense layer with 512 neurons captures the main features, while Dropout prevents overfitting and boosts robustness, making the model less reliant on individual neurons and more capable of generalizing to new data. The softmax output enables accurate classification among the various characters.

Choosing ConvNet50 as the pre-trained base model felt like selecting the best superhero to tackle the battle for Simpsons recognition! Also known as ResNet50, this network is built on a 50-layer deep structure designed to scrutinize every pixel with microscopic precision. ConvNet50 is pre-trained on ImageNet, a dataset that has processed millions of images and learned to recognize even the smallest details. This means that, even if it’s never seen Homer, Bart, or any Simpsons episode, it already knows how to identify shapes, colors, and textures to near perfection.

Why ConvNet50? First, this network’s design incorporates an architecture based on residual blocks. These blocks help maintain the information flow even in a deep network like this one, ensuring high accuracy and reducing the risk of vanishing gradients. It’s like giving the network the best GPS possible, so it always knows where it’s heading, no matter how long the journey. In our case, this means a network that stays on track, avoiding drift into errors and maintaining focus even on the finest details.

Another base model alternatives I explored:

  • InceptionV3: Another deep learning powerhouse, known for its ability to handle multiple scales within images. InceptionV3 could have offered greater flexibility in recognizing details like Marge’s big blue hair or Bart’s rebellious spikes, as it explores different dimensions of the same image. Often oversized, InceptionV3 is ideal for scenarios with highly intricate details that require multi-scale detection.
  • VGG16 or VGG19: Widely used and simpler in structure compared to ConvNet50, yet deep and precise. These networks perform excellently in many computer vision applications, though they tend to be less efficient in terms of resources.
  • MobileNet: Ideal if my goal were to deploy the model on mobile or low-resource devices. MobileNet is fast and lightweight—an extreme nerd choice if I wanted my CNN to run on an embedded system. But for the Simpsons, opting for a more powerful model made sense!

Ultimately, ConvNet50 offers the perfect balance: it’s deep enough to capture the complexities of Springfield’s characters, well-trained to capture even the smallest details, and optimized to provide fast and efficient results without overloading the system.

To achieve excellent results, I incorporated data augmentation, an essential technique for improving model performance, especially when the dataset is imbalanced or limited in the number of images. In our case, data augmentation allows us to virtually increase the size of the dataset by creating variations of existing images (through rotation, zoom, contrast, and horizontal reflection).
Mad Self Portrait of myself analyzing the results archived
A self-portrait of myself analyzing the outstanding results achieved

After transfer learning, where we unlock and retrain only the final layers of the pre-trained model, I applied fine-tuning, unlocking and retraining only the last layers of the model. This approach allows the model to specialize in the details of the Simpsons characters, retaining general knowledge while adapting to the specific nuances of the new dataset.
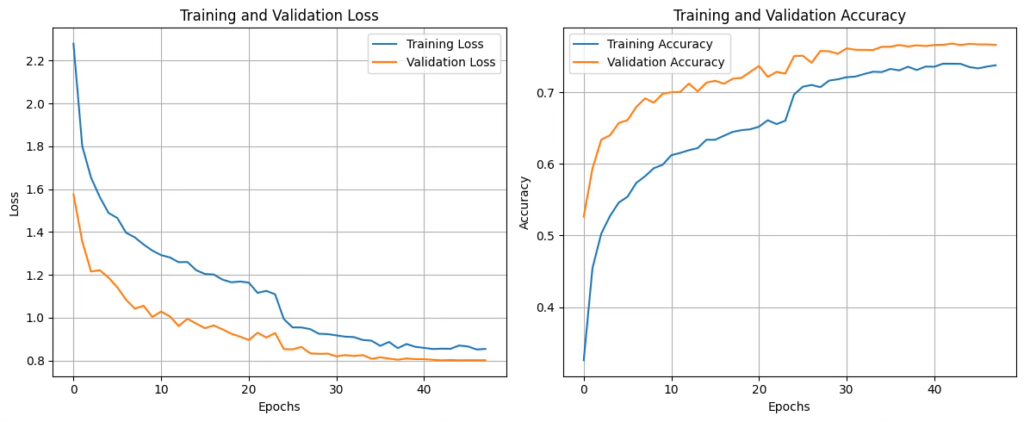
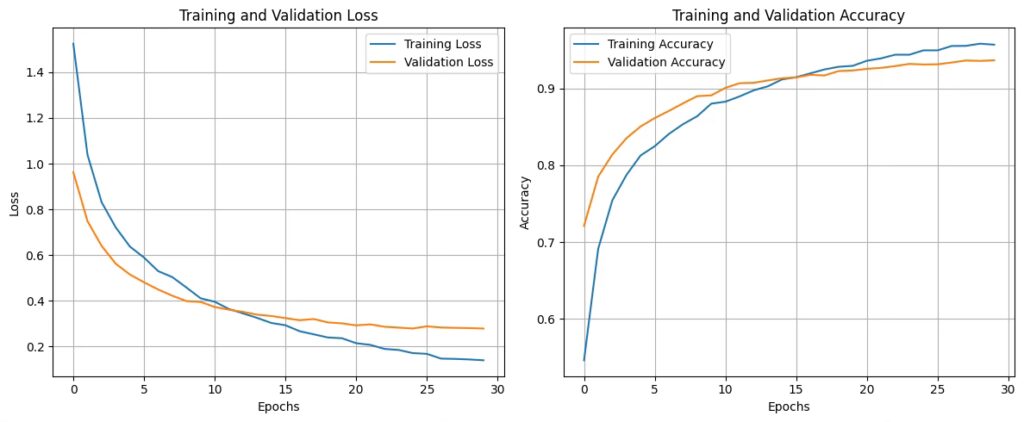
Validation e Training Dataset – Loss and Accuracy during Transfer Training
Validation e Training Dataset - Loss and Accuracy during Fine Tuning Training
Validation e Training Dataset – Loss and Accuracy during Fine Tuning Training
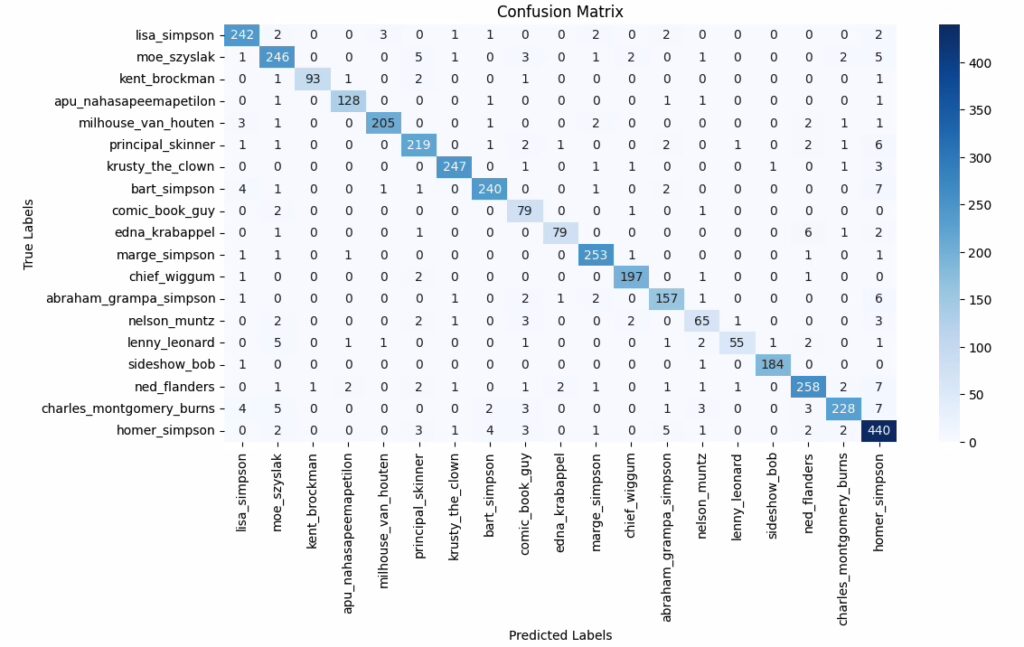
Simpson Characters Recognition – Confusion Matrix

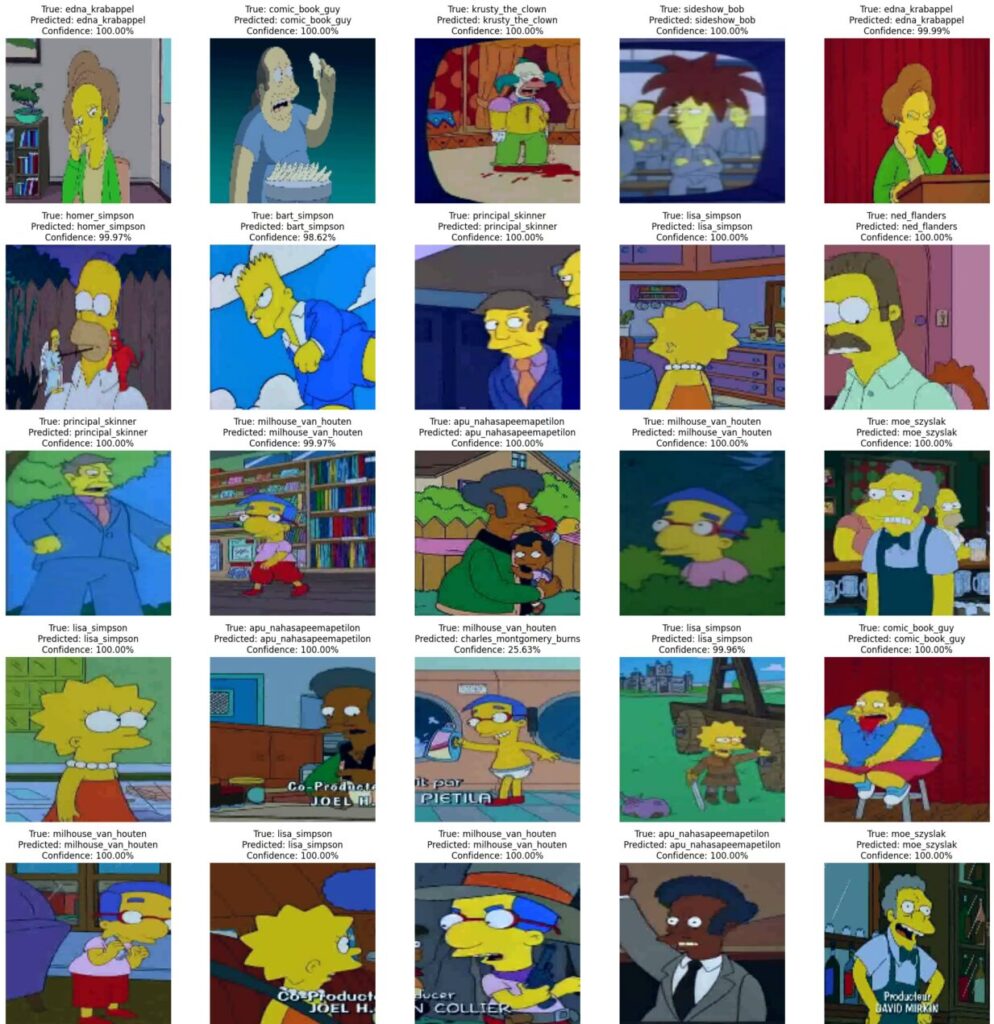
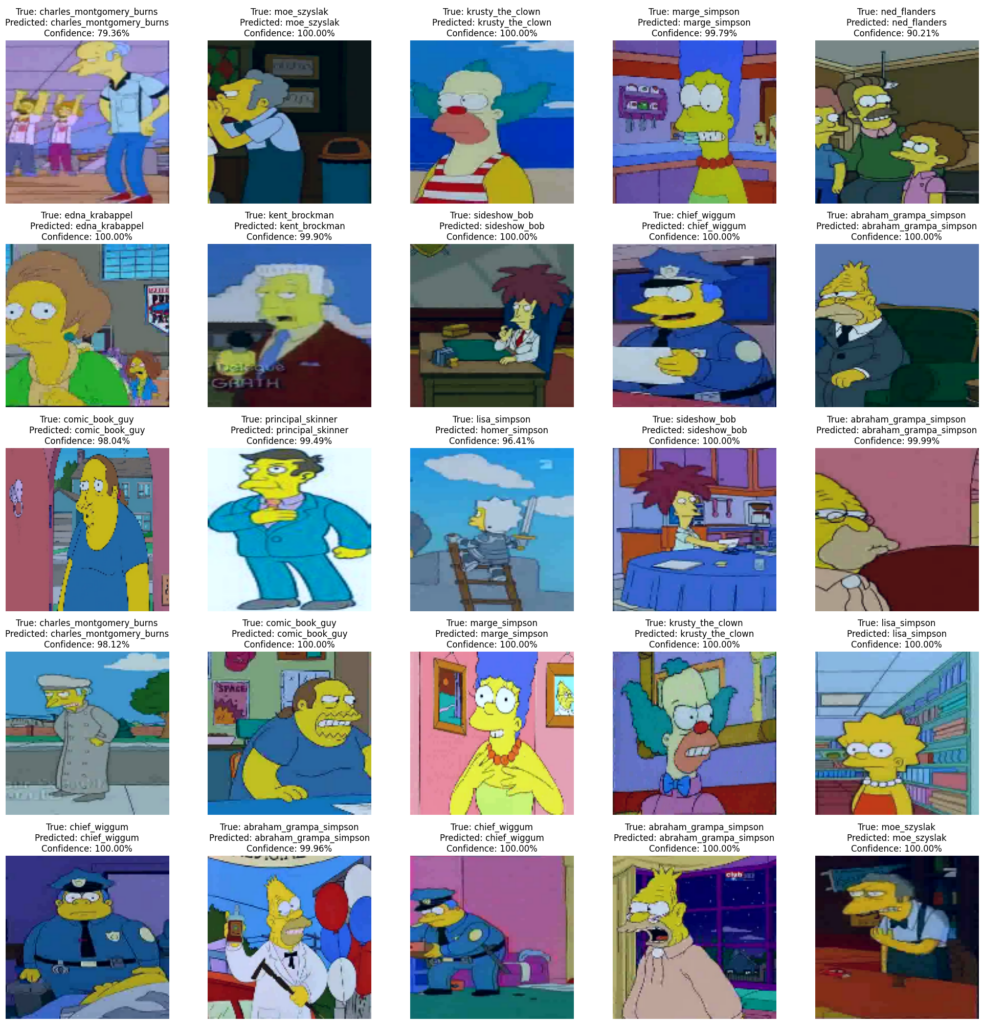
We present the simulation on images from the dataset not used in training, showcasing the actual character, the recognized character, and the network’s confidence level. These are images the network has never seen before, yet it identifies them with a high degree of certainty. Click on the images to view them in detail.
ANALYZE, REVIEW, AND FREELY MODIFY THE KAGGLE NOTEBOOK WITH THE SOURCES HERE

This project is highly reusable for numerous similar applications. Depending on the project’s requirements, one could adjust the model’s structure or choose a different base model.

GITHUB SOURCE – CNN-SIMPSON

“In the wise words of Homer Simpson, ‘Mmm… data!’ With this model, even Springfield would be proud of our machine learning journey!”

The charts and model performance metrics are based on a single execution of the notebook. With each run, these values may vary slightly, yet they consistently remain optimal and align closely with the results shown.

If this topic has sparked your interest and you’d like to delve deeper, I suggest these references:

Kaggle – Convolutional Neural Network (CNN) Tutorial – Kaggle

Coursera – Convolutional Neural Networks by Andrew Ng

Stanford University – CS231n: Convolutional Neural Networks for Visual Recognition

GitHub – CNN Explainer

Udacity – Convolutional Neural Networks

Dive into Deep Learning (D2L)

Kaggle – Transfer Learning for CV Guide

Share

Face Detection e Face Recognition in Python – Test su Matrix Reloaded e Game of Thrones

Uno dei post che ha generato il maggior interesse in questo blog è certamente quello dedicato alla face detection tramite OpenCV. Riprendiamo questo tema dopo molto tempo parlando degli algoritmi alla frontiera per il Face Detection e Face Recognition. Lo scopo del post è fare il punto sullo stato dell’arte ed indirizzare verso mouduli open source liberamente e facilmente utilizzabili nelle applicazioni reali.

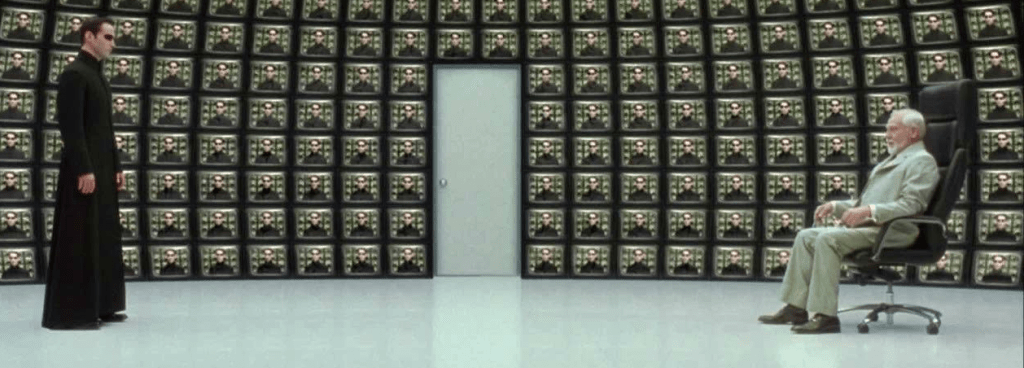
Matrix Reloaded – The Architect

La Face Detection è l’elaborazione che ha lo scopo di rilevare la presenza di volti umani all’interno di un’immagine digitale; nel precedente articolo è stata affrontata solo questa tematica attraverso algoritmi tradizionali ma consolidati.

Gli algoritmi di Face Detection si sono evoluti nel tempo migliorando l’accuratezza della rilevazione anche attraverso l’uso di reti neurali convoluzionarie (CNN) o reti Deep Learning opportunamente strutturate ed addestrate; tale processamento sfrutta massivamente l’eventuale presenza di moderne GPU o NPU per aumentarne l’efficienza ed il parallelismo. Nel nostro caso specifico ci siamo limitati al riconoscimento di volti umani in posizione frontale.

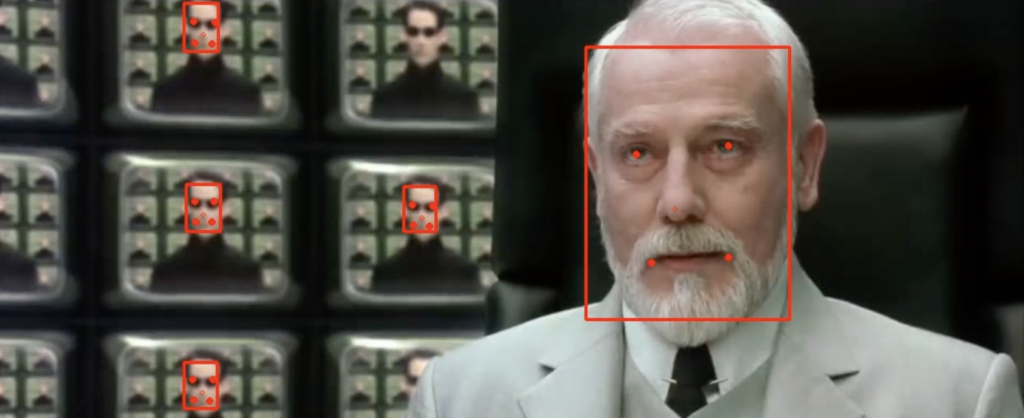
Matrix Reloaded Architect – Face Detection Benchmark MTCNN

Il benchmark estremo che ho utilizzato per mettere alla prova i moduli python individuati, è un breve video tratto dal dialogo tra Neo e l’Architetto in Matrix Reloaded; nel video, in un’atmosfera surreale, sono presenti innumerevoli volti che variano rapidamente per dimensione, inclinazione, espressione, presenza o meno di occhiali. Un video estremo di prova che farà friggere neuroni e sinapsi anche alle più evolute e performanti reti neurali convoluzionarie.

Questo è il video che è stato prodotto attraverso la nostra elaborazione:

Il Benchmark che ho utilizzato per la Face Detection in Python – L’architetto in Matrix Reloaded – questo è il risultato ottenuto tramite l’uso del modulo MTCNN insieme ad OpenCV che ho usato per l’elaborazione del video

Il modulo Python che, almeno nei miei esperimenti, ha dimostrato i migliori risultati in termini di qualità e prestazioni è MTCNN; in esecuzione su una sessione Colab con GPU attiva elabora efficientemente il flusso di frame con un livello di accuratezza molto alto se si escludono i volti in posizione non frontale. Nel video prodotto si trova l’esito dell’elaborazione dove, oltre ai volti, sono stati marcati anche alcuni punti caratteristici del viso (occhi, naso, estremi della bocca). Questo modulo è quello che riesce a rilevare meglio volti di dimensioni più piccole e non perfettamente allineati garantendo anche un’efficienza molto più alta degli altri moduli provati; MTCNN fornisce, per ogni volto rilevato, anche un livello di confidenza nella rilevazione (in tutto il video ho trovato solo un falso positivo pertanto non ho ritenuto necessario introdurre una soglia).

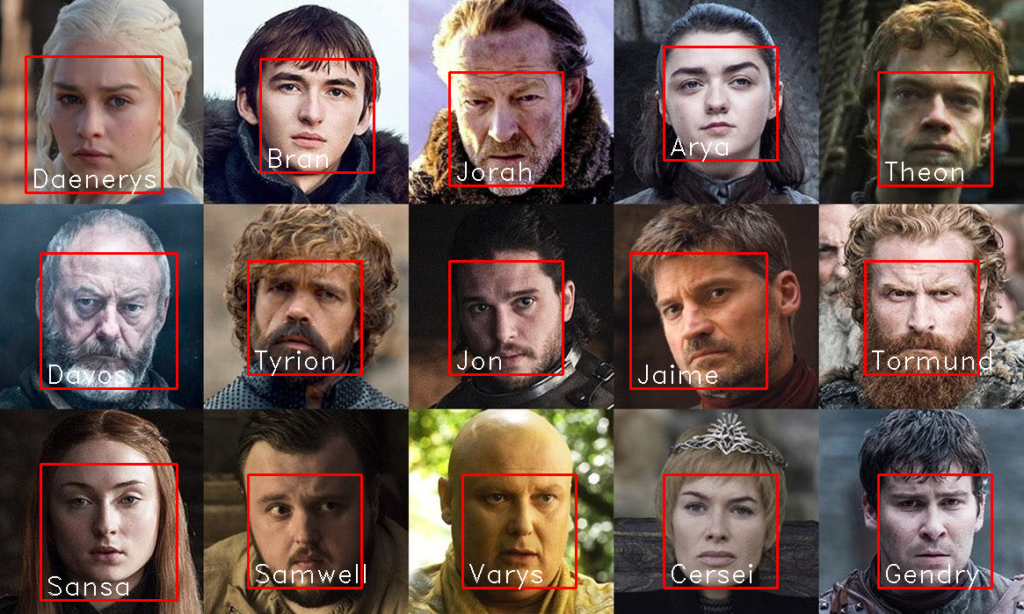
Il Trono di Spade – foto usata come base per l’apprendimento dei principali personaggi

In alternativa, si propone l’uso del modulo: face_recognition che ha comunque garantito un’ottima precisione su volti di dimensioni significative ed un’efficienza adeguata; su tale modulo è possibile variare l’algoritmo di rilevamento (CNN o HOG) ed effettuare del tuning per cercare di rilevare volti di dimensioni minori. Sul benchmark utilizzato la rilevazione CNN non riusciva ad intercettare gli stessi volti di MTCNN mentre la rilevazione HOG, oltre a non velocizzare molto il processamento, riduceva drasticamente il numero di volti rilevati. In condizioni normali anche questo modulo è da considerare un’ottima scelta e noi lo useremo per effettuare anche il Face Recognition. Questo modulo può richiedere un quantitativo di memoria sulla GPU più elevato soprattutto se si vogliono rilevare i volti con dimensioni più piccole.

Tutti i personaggi sono stati correttamente rilevati

Dopo aver rilevato ed isolato i volti, l’elaborazione della Face Recognition ci permette l’associazione di un volto ad una persona. In assenza di informazioni o di preappendimento sulle persone da ricercare, è possibile aggregare i volti su possibili individui basandosi sulla similitudine delle caratteristiche fisiologiche e biometriche. Gli algoritmi per effettuare tale riconoscimento, per codificare un volto in un insieme di parametri comparabili sono davvero molteplici e tutti estremamente interessanti. Anche in questo caso le reti neurali convoluzionarie (CNN) offrono un contributo importante a questi algoritmi.

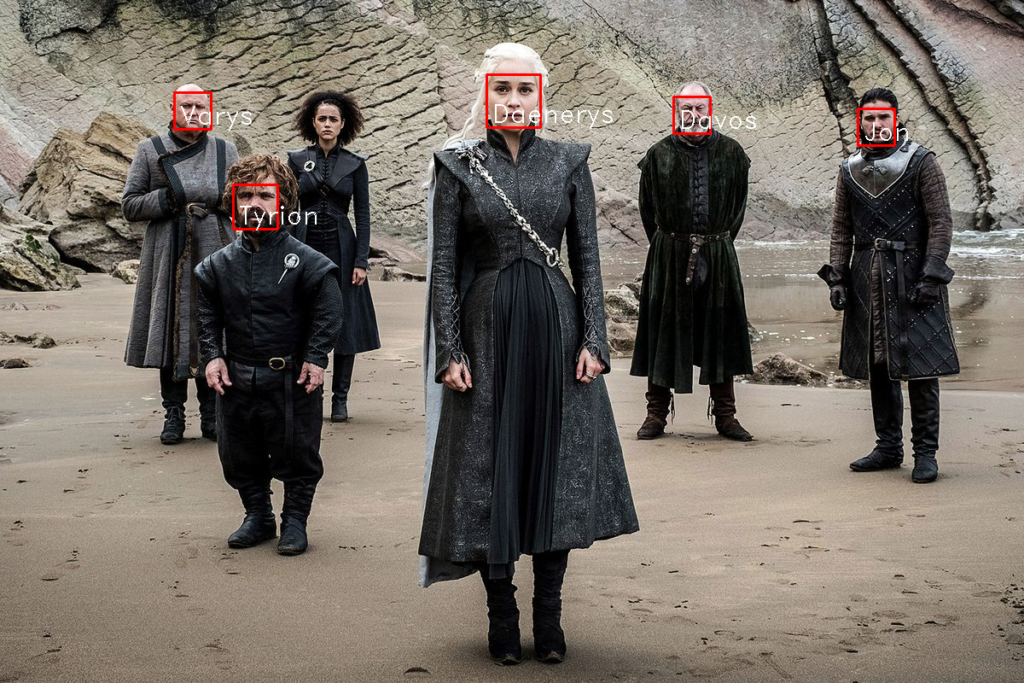
Tutti i personaggi sono stati correttamente rilevati ad eccezione di Missandei che non era presente nella foto iniziale

Per implementare un Face Recognition in pochissime righe di codice Python ed in modo efficiente è possibile usare il modulo face_recognition; se si vuole approfondire come questo modulo funziona internamente vi consiglio di leggere questo aricolo.

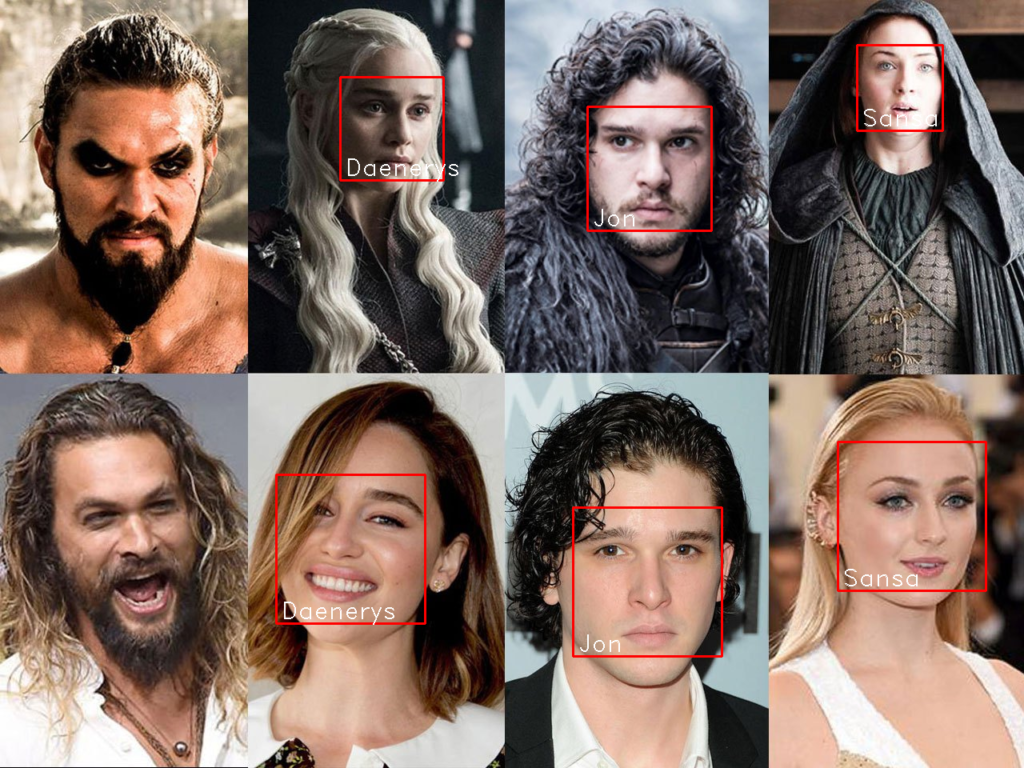
Tutti gli attori presenti nel file di training sono stati correttamente rilevati anche senza abiti ed acconciature di scena. Come atteso Drogo non viene rilevato perché non presente nel file di training.

In questo caso ho creato un notepad colab di test che da una foto iniziale acquisisce le caratteristiche fisiologiche e biometriche dei vari personaggi della serie Il Trono di Spade; il modulo utilizzato, alla versione attuale, dovrebbe rappresentare ciascun volto tramite 128 parametri caratteristici.

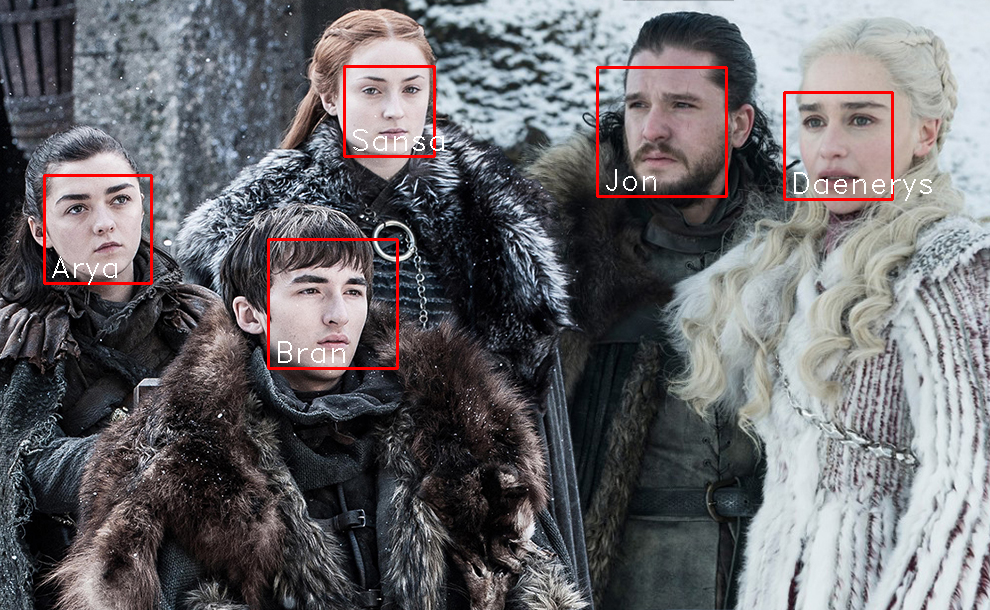
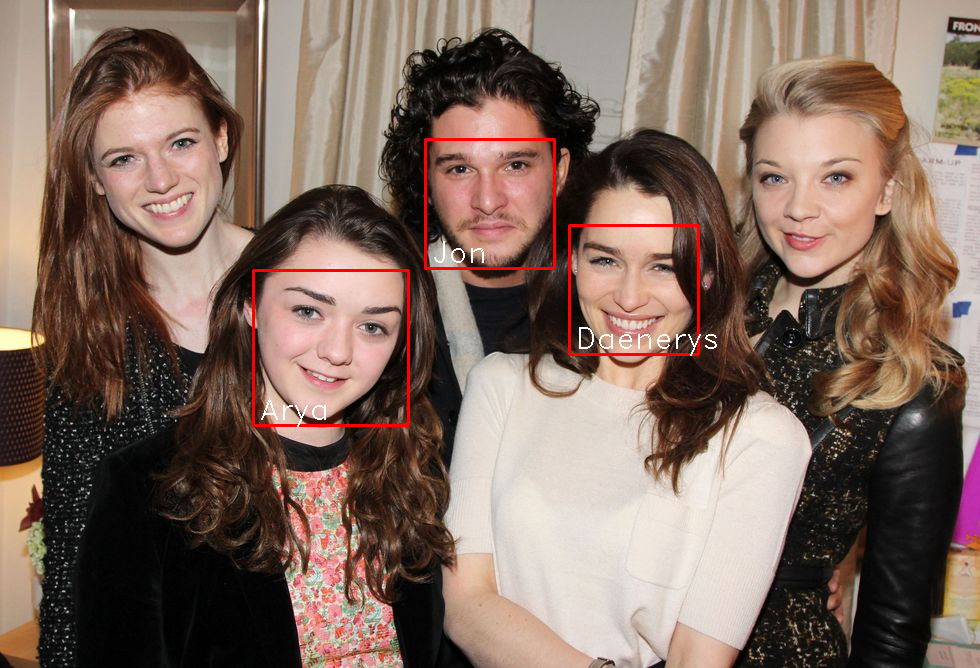
tutti gli attori presenti nella foto di training sono stati rilevati anche Daenarys che appare molto differente rispetto al personaggio interpretato

Per testare il rilevamento ho provato a far riconoscere i personaggi su altre foto contenenti anche personaggi non presenti all’interno della foto di apprendimento; i risultati sono impeccabili. Il modulo utilizzato ha un’accuratezza eccellente sia per quanto riguarda i personaggi appresi che per quelli non analizzati che non ha mai classificato come falsi positivi.

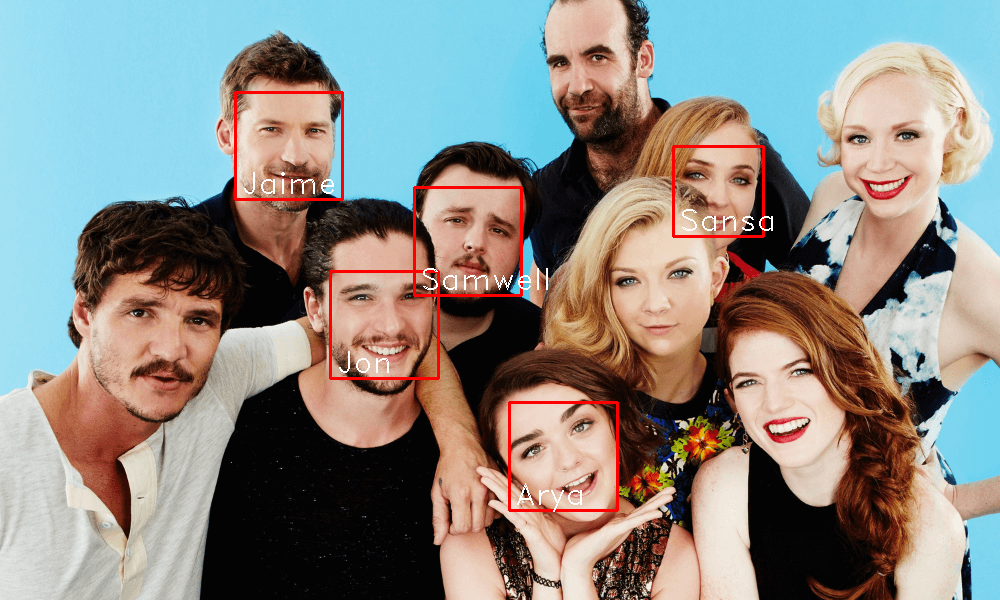
anche in questo caso tutti gli attori presenti nella foto di training sono stati individuati correttamente

Per spingere oltre il test abbiamo avviato la detection su foto in cui gli attori non appaiono con i costumi di scena ed hanno acconciature o il colore dei capelli totalmente differente dai personaggi che hanno interpretato; anche in questo caso l’algoritmo non sbaglia e non rileva mai falsi positivi.

Anche se non ho effettuato delle prove dirette, sono convinto che l’algoritmo scali bene all’aumentare del numero delle persone da rilevare; non ho provato a sottoporre qualche foto degli attori quando erano più giovani.

NOTEBOOK COLAB – UTILIZZATO PER LA FACE DETECTION E FACE RECOGNITION

Concludiamo dicendo che oltre alla Face Detection ed alla Face Recognition ai volti possono essere applicati altri algoritmi per l’estrazione di caratteristiche molto importanti come la rilevazione del sesso, dell’età, del sentimento (es. rabbia, gioia, paura, sorpresa, …).

Fatemi sapere i vostri pareri e le vostre esperienze su Face Detection, Face Recognition nei commenti.

Share